Part of being thrifty can involve making your own food rather than buying it.
Ages ago I discovered this shortbread recipe from Margaret Fulton but I just never got around to making it. Until this weekend!
So what changed?
It may be that I picked up one of those absolutely fantastic silicone baking sheets so now I don't have the fear my delicious crumbly morsels will stick to the tray (by the way, I HIGHLY recommend those silicone baking sheets - pure baking gold!).
This recipe is a bargain on two fronts. Firstly, it only has three ingredients that cost next to nothing and secondly, you know what you are eating. No nasty hidden extras you would rather not eat if you knew they were there.
So here is my attempt!
As promised, three ingredients: 250 grams butter (at room temperature), 1/2 cup of caster sugar and 3 cups of plain flour.
Preheat your oven to 160 degrees celsius.
Beat the butter in a bowl with an electric beater until it resembles whipped cream, then add the sugar gradually, beating it until light and fluffy. Work in the flour gradually, then knead the dough for about 5 minutes, until the mixture is very smooth.
Wear an appropriate apron as food always tastes better when if it made wearing an appropriate apron!
Have the necessary tools on hand.
Using your hands push the dough out to about 1/2 cm thick on a floured surface (the baking sheet can come in handing here - you can do all this on the baking sheet). Use a rolling pin to smooth over the surface if you like.
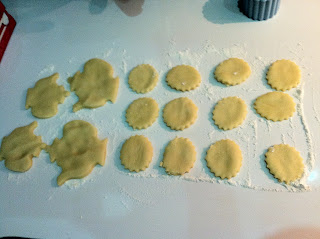
Use whatever cutter you like (I decided on some little teapots, then decided part way though to try out some round ones with frilly edges) to cut out shapes.
Use the spatula to get the little shapes of dough off the bench (this is a little difficult to do without skewing the shapes).
NOTE: Part way though, I realised that because it was a lovely warm spring evening, my dough was so warm it was too soft to work with. If you also have this problem. Roll the dough into a ball, wrap in cling wrap and pop it in the freezer to 10-15 minutes to firm up. Then take it out, knead it briefly until smooth and start this section again.
Once you have your tasty little shortbread shapes, pop them onto a greased baking tray or a silicone baking sheet on a backing tray and put into the preheated oven. The time depends on the size and thickness of your shortbreads. I put mine on for 15-18 minutes but if you use a larger cutter, you will need to give it a bit more time.
They are ready when they just start to brown a little. If you aren't sure how long to put them in for, keep a close eye on them because it is a very short timeframe between lightly tanned and charcoal!
Once out of the oven, transfer the shortbread onto a wire rack to cool. It is lasts longer than a couple of hours after baking, it can be stored in an airtight container.
YUM!
P.S. The tradition shape for shortbread is to divide the dough in two. Push out each half into a circle about 24cm in diameter on a baking tray. Crimp the edges by pinching the dough between your fingers, or pressing a fork around the edge to create a frill. Using a 7cm round biscuit cutter, cut a circle in the centre of the dough. Keeping that smaller circle whole and intact, cut the remaining round into 12 segments. Prick decoratively with a fork, lightly dust with extra caster sugar and bake for 40 minutes.


No comments:
Post a Comment