Monday, December 5, 2011

The Bonnes Affaires Christmas Gift Guide - Under $100

Christmas shopping is ramping up around the globe.

If you have someone special in you life you might be looking to spend up to $100 on a gift.

Below are some lovely gifts in that price range that will suit almost anyone!

UNDER $100
1.
2.

3.

4.


5.

1.  Longchamp Le Pliage Coin Purse (various colours available) - $65 - Hunt Leather or Longchamp Stores

2.  Cire Trudon Miniture Chandle (Mademoiselle de la Valliere) (various scents available) - $65 - Becker Minty

3.  Paris Breakfast Original Watercolour - Pink Macaroon Box - US$85 (plus postage) - Etsy


4.  Oroton Photo Frame and Alarm Clock - $75 - Oroton Stores

5.  Laguiole Cheese Knife Sets (various colours and knives in each set) - $89 - $99 - Alfresco Emporium and Peter's of Kensington


If you missed the Under $20 gift guide, click here.

Keep an eye out for the upcoming Under $50 and Under $200!

Wednesday, November 30, 2011

Mulberry and Apple Crumble

You never see mulberries at the supermarket for sale.  Such a shame.  A completely underrated berry, in my opinion.

Anyway, I was up visiting my Mum a few weeks ago and she has a mulberry tree.  We picked and ate to our heart's content.  I ended up with a purple mouth and purple hands and feet.  Such fun!

As the weekend was such a rush, I carefully packed some of the delicious berries into a container and brought them home with me.

Now to the crumble!
Yum!
Heat the oven to about 170 degrees celcius (about 180 if you don't have a fan-forced oven).
125gm butter
125gm plain flour
50gm sugar (add a little brown for a really caramel-y crumble!)

Rub the butter, flour and sugar together until it feels a crumbly texture.  Set aside.

Two pink lady apples (I'm sure any apples would work)
Cut your apples up onto bit-sized chunks.

Mmmmm.....the star - mulberries!  I used about 2 cups worth.  Wash thoroughly!


Layer the apples chucks and the mulberries in an oven proof dish.
Sprinkle with about 50 grams of caster sugar (use more or less depending on your taste.  I don't like mine sickly sweet).

Cover the fruit with an even layer of the crumble mixture and bake for 35 - 45 minutes or until golden on the top.


I like mine with custard.

Mmmmm....so delicious!

Monday, November 28, 2011

The Bonnes Affaires Christmas Gift Guide - Under $20

Today's post is for all the true bargain hunters out there looking for beautiful but affordable Christmas gifts.

This is for a selection of gifts for under $20.  Following posts will provide a selection for under $50, under $100 and under $200.

UNDER $20


1
2
3

4


5


1.  Lindt Delice Macaroons (various flavours available) - $2.70 (cheaper if you buy a boxful) - Lindt Chocolate Cafes

2.  Built NY Netbook Sleeve Micro Dot 9-10 inch (other colours/designs available) - $18 - Peter's of Kensington

3.  Mimco Nouveau Barrette - $19.95 - Mimco

4.  T2 Turkish Tea Glass - $18 - T2

5.  Personalised Luggage Tags - $12.95 - Bag Tag Studio


Good luck with the Christmas shopping!!

Monday, October 17, 2011

The face cream to end all face creams!

After searching my whole life, I have finally found the very best face cream on the planet!

It's not La Mer, it doesn't have gold flecks in it and it doesn't cost a lot.  I know that sounds too good to be true but be prepared to be dazzled.

If you are in Australia, you might have seen them advertising the new Garnier BB Cream.  Not that anyone knows what a BB cream is but a little research revealed something amazing.

BB stands for "blemish balm".  It is a cream given to people who have had laser or similar treatment on their faces to simultaneously cover blemishes (or healing scars), protect from the sun and promote healing.

Some Korean actresses got hold of this stuff and it took off like a shot in Korea.  Other countries have been slow to start but it is now making its way around the world as the next hot thing since YSL Touche Eclat!

Rather than buy the various incarnations available on the internet, I went to the source: the original.  It is made by a Korean company called Missha.  They have a store in the Queen Victoria Building in Sydney or you can pick it up online at various sites.  They stock a few different types but I went for the Signature Real Complete BB Cream as I have combination skin.

It was only $36.90 and it is truly amazing!
Missha Signature Real Complete BB Cream

It does the following:
1.  Covers my pimples
2.  Covers the dark circles under my eyes
3.  Evens skin tone
4.  Reduces redness
5.  Protects from the sun (SPF 25)
6.  Smooths fine lines (although I don't admit to having many yet
7.  Provides a beautiful base for make up
8.  Doesn't feel heavy (more like a sunscreen weight that foundation weight)
9.  Matches your skin tone without fiddling with numerous colours (comes in either yellow based or pink  based)
10. Stays on all day (and all night if you are naughty).


Using this you no longer need a moisturiser, sunscreen, foundation, concealer or primer.

Plus you can wash it off in the shower with a good cleanser.

I cannot recommend highly enough that you go out and try this product!

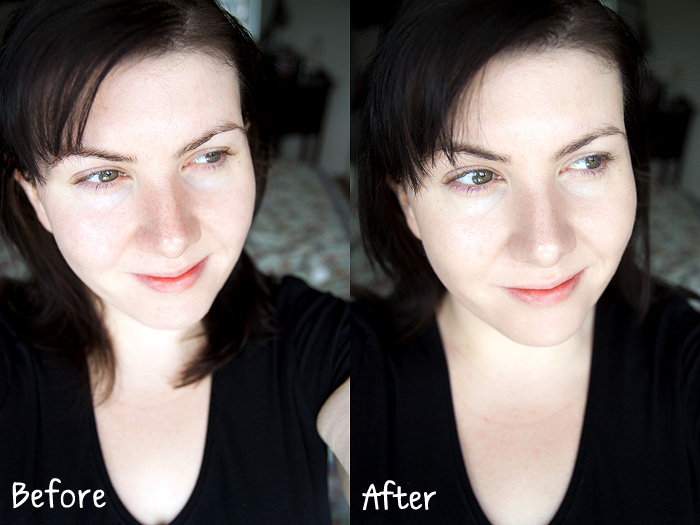
Before and after using Missha M Perfect Cover BB Cream (Lipglossiping)


My morning routine has shrunk to cleansing, putting on the BB cream, mascara, blush and lipstick.  On the weekends I usually only do the first two!

Thanks for...

Strawberries and Cream Tisane from T2.

Purple roses that smell like heaven!

Home-made soup with leek, cauliflower and fennel.

Wandering through the park during the day.

Soy tea cup candle that smells like holidays (coconut and lime).

Monday, September 26, 2011

Little tubes of magic from France

I read all the time that you should skimp on your cleanser and splurge on your moisturiser.

I can't say I have ever paid more that $100 for a moisturiser, plus my skin reacts to something in every product I have tried labelled "anti-aging".  Therefore, the last thing I want is to put down $300 for La Mer and end up using it once and looking like I have a red, raw face.

I once tried a you-beaut moisturiser from Clinique.  I usually don't have too much trouble with their skincare products (unlike Lancome, Aveeno and Olay).  So off I went on honeymoon with my little tub of magic.  It was magic all right.  It turned my lovely skin from peaches and cream to red and angry!  I spent my whole honeymoon with my face covered in a rash and not being able to wear any make up!

But to the rescue came a true little tube of magic.

At the first sign of the rash, I raced from my NYC hotel room down the street to Duane Reade.  There I found my saviour.  Eau Thermale Avene Skin Recovery Cream.

I used it as my moisturiser for the rest of the trip and the rash was almost gone by the time I got home.

Eau Thermale Avene actually make a whole stable of brilliant skincare products.  They are all made in France, most do not contain those nasties like parabens, and they have an excellent range for people with sensitive skins.  Not to mention their products for men and children.

I currently use their Clearance K moisturiser.

I must add, their 30+ Sunscreen is awesome!  Most sunscreens drip into your eyes as you sweat in summer causing stinging and crying.  This one is made with proper zinc and titanium dioxide (with a slight tint so you don't look too white) rather than nasty chemical sunscreens.  I even put it on my eyelids and under my eyes without any stinging even in the middle of a Sydney summer.  Highly recommended.

You can pick up your own tubes of magic at Priceline and other good pharmacies (and Duane Reade if you are in NYC!).

Thursday, September 22, 2011

Mmm...Magic Chocolate Fudge Pudding

I'm a big fan of making things rather than buying them.

This is a recipe my Mum gave me and it is delicious!  I decided to do a different take on it and it wasn't completely successful but who cares, it still tasted good.

So this is Magic Chocolate Fudge Pudding (or in the pics below, Magic Chocolate and Coconut Fudge Pudding)!

(The magic bit is that you put the sauce on the top and when you take it out of the oven, the sauce is on the bottom!)


 Preheat your oven to 180 degrees celsius (fan-forced).  Grab your ingredients and off you go!
1 cup plain flour
3/4 cup sugar
2 tablespoons cocoa
2 teaspoons baking powder
1/4 teaspoon salt
1/2 cup milk
1 teaspoon of vanilla
1 cup of chopped walnuts or peacans
3/4 cup brown sugar
1/4 cup cocoa (or you can use drinking chocolate)
1 3/4 cups hot water

Since I am making mine with a coconut twist, I have replaced the nuts with shredded coconut and used 3/4 cup of coconut milk and 1 cup of hot water rather than using all water (in hindsight I think the better switch would have been the 1/2 cup milk for 1/2 cup coconut milk).


Add the flour, sugar, cocoa, baking powder and salt to a bowl. 


Add the milk and vanilla and mix until smooth.

Then add the nuts (in my case, I added shredded coconut).


Mix together the brown sugar and the 1/4 cup cocoa or drinking chocolate (I prefer the cocoa myself as it is a bit less sweet) in a separate bowl.


Pour the batter into a greased oven dish and smooth the top with a spatula.


Sprinkle the brown sugar/cocoa mix over the top.


Then pour the hot water (or in my case, hot water/coconut milk mix) over the back of a spoon on to the top.  I recommend you do it over the back of a spoon otherwise the pressure of the water digs holes in the batter!


Bake for 30 minutes, then voila!  Magic Pudding!  This one doesn't look as good as usual because my sauce didn't all settle properly.  The original recipe it definitely the best but the coconut did give it a little something.  Usually you end up with a nice springy chocolate cake with a delicious thick chocolate sauce underneath.  Kind of like those self-saucing packet puddings you buy but a million times better!

You can also make this recipe in 6 ramekins (like the one below).  I often do this for dinner parties.  Just cook for 15 mins or so (you can push with a finger on the top of the pudding and when it springs back it is ready).


I usually serve with double cream and strawberries but today, I'm having it au natural!

Wednesday, September 21, 2011

DIY French Manicure

I love manicures!

I love having pretty nails all the time but even at $20 every couple of weeks, it does take it's toll.  I could by a nice shirt for that price.

So the other day, while visiting me local Priceline, I picked up a french manicure set in one of my favourite brands.

The Bourjois French Manicure Kit is super.  I'm not a genius with a brush but the cute little curved brush that comes in the white polish made it really easy to apply.  It dried really quickly with a very good result.  This little box of joy can give you a lovely French manicure every week for the next 6 months (at least) all for the bargain price of $24 (that was with 20% at the sale Priceline are having at the moment!). Below is my very first attempt.  Not bad, huh?!

The Joys of Youth

Last night I went to the opera.  It was a famous one complete with celebrity actors.  I sat in a box seat right at the front with just me and my husband.  I was so close I could look into the orchestra pit and see the sweat on the actors faces.

Guess how much my ticket was?

$40 - less than half the normal adult price!

Why you ask?

I have the pleasure of being 29 years old.  Until my 30th birthday I have the very enviable position of being able to buy tickets to amazing theatre, dance and music events for less than the pensioner or student rates!

So even if you haven't yet developed a taste for fine events, now is the time.  Get in while you are young as you might just experience something amazing.

Check out the following websites for great under 30's deals.  The deal won't be for all shows but there are some really good ones!

Sydney Dance Company
Sydney Theatre Company
Sydney Opera House
Sydney Symphony Orchestra
Australian Ballet

By the way, I watched The Threepenny Opera starring Eddie Perfect (of "Offspring" fame).  It was awesome!!

Monday, September 19, 2011

Mmmm...Shortbread

Part of being thrifty can involve making your own food rather than buying it.

Ages ago I discovered this shortbread recipe from Margaret Fulton but I just never got around to making it.  Until this weekend!

So what changed?

It may be that I picked up one of those absolutely fantastic silicone baking sheets so now I don't have the fear my delicious crumbly morsels will stick to the tray (by the way, I HIGHLY recommend those silicone baking sheets - pure baking gold!).

This recipe is a bargain on two fronts.  Firstly, it only has three ingredients that cost next to nothing and secondly, you know what you are eating.  No nasty hidden extras you would rather not eat if you knew they were there.

So here is my attempt!


As promised, three ingredients:  250 grams butter (at room temperature), 1/2 cup of caster sugar and 3 cups of plain flour.

Preheat your oven to 160 degrees celsius.

Beat the butter in a bowl with an electric beater until it resembles whipped cream, then add the sugar gradually, beating it until light and fluffy.  Work in the flour gradually, then knead the dough for about 5 minutes, until the mixture is very smooth.


Wear an appropriate apron as food always tastes better when if it made wearing an appropriate apron!


Have the necessary tools on hand.


Using your hands push the dough out to about 1/2 cm thick on a floured surface (the baking sheet can come in handing here - you can do all this on the baking sheet).  Use a rolling pin to smooth over the surface if you like.

Use whatever cutter you like (I decided on some little teapots, then decided part way though to try out some round ones with frilly edges) to cut out shapes.  

Use the spatula to get the little shapes of dough off the bench (this is a little difficult to do without skewing the shapes).

NOTE:  Part way though, I realised that because it was a lovely warm spring evening, my dough was so warm it was too soft to work with.  If you also have this problem.  Roll the dough into a ball, wrap in cling wrap and pop it in the freezer to 10-15 minutes to firm up.  Then take it out, knead it briefly until smooth and start this section again.


Once you have your tasty little shortbread shapes, pop them onto a greased baking tray or a silicone baking sheet on a backing tray and put into the preheated oven.  The time depends on the size and thickness of your shortbreads.  I put mine on for 15-18 minutes but if you use a larger cutter, you will need to give it a bit more time. 


They are ready when they just start to brown a little.  If you aren't sure how long to put them in for, keep a close eye on them because it is a very short timeframe between lightly tanned and charcoal!

Once out of the oven, transfer the shortbread onto a wire rack to cool.  It is lasts longer than a couple of hours after baking, it can be stored in an airtight container.


YUM!

P.S.  The tradition shape for shortbread is to divide the dough in two.  Push out each half into a circle about 24cm in diameter on a baking tray.  Crimp the edges by pinching the dough between your fingers, or pressing a fork around the edge to create a frill.  Using a 7cm round biscuit cutter, cut a circle in the centre of the dough.  Keeping that smaller circle whole and intact, cut the remaining round into 12 segments.  Prick decoratively with a fork, lightly dust with extra caster sugar and bake for 40 minutes.

Thursday, September 15, 2011

Thanks for...

Gorgeous Green Art-Deco Earring (Lovisa, AU$15.99)
Sleeping kittens
My iPhone 4 (which takes most of the pictures on this site)

The best pink lipgloss ever invented!  My perfect pink is a gorgeous bright bubblegum colour.  What's yours? (Bourjois Rose Exclusif, AU$22.95)
Free tea in the mail from Madame Flavour.  Testing out the new Mint Lavender Tisane (AU$29.40 plus postage for 6 boxes of 18 pods).